Reverse Engineering CBORD GET Mobile Barcode Generation
This took way too much time.
Why Even Attempt This?
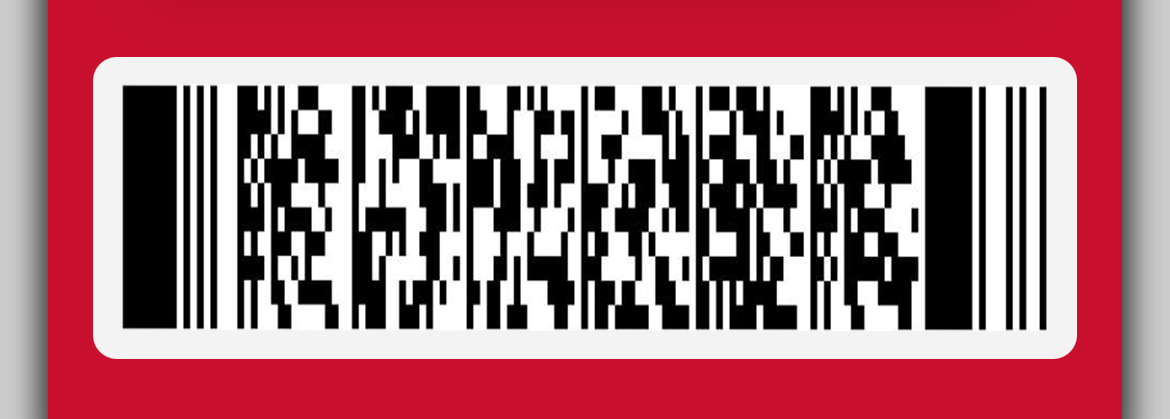
At Northeastern, GET Mobile is used to open dorm doors, or swipe into a dining hall if students don't have their physical student IDs. However, the app is, put simply, not great. It's slow and the UI is clunky. The app takes multiple seconds to fully launch into a usable state, and creates unnecessary new sessions if you leave the app for just a moment. Overall, it’s not great UX, in my opinion.
This is why I created GET Open Door, a simple, fast iOS app, natively written in Swift and SwiftUI, that aims to replicate the functionality of GET Mobile, at least, the parts that Northeastern supports. One of the features I wanted to implement was being able to generate scannable barcodes from within the app, much like the GET Mobile app, and thus, we end up here, attempting to reverse engineer the barcode generation process. Surely, it's not that difficult, right?
Disclaimer
The information provided in this post is mainly for documentation and educational purposes. This post does not disclose any secrets necessary to replicate the functionality of the GET Mobile app, rather it documents the process of reverse engineering the barcode generation process. The information is provided as is with no express or implied warranties nor guarantees of any kind.
Grasping the Barcode Format
To begin, we need to understand how the GET Mobile app generates barcodes. Looking at the barcode, it looked like a PDF417 barcode. If we take a barcode from the app and, using Jupyter Labs, read the data encoded using the pdf417decoder package, we get the following decoded data: 174590541010173*****55.
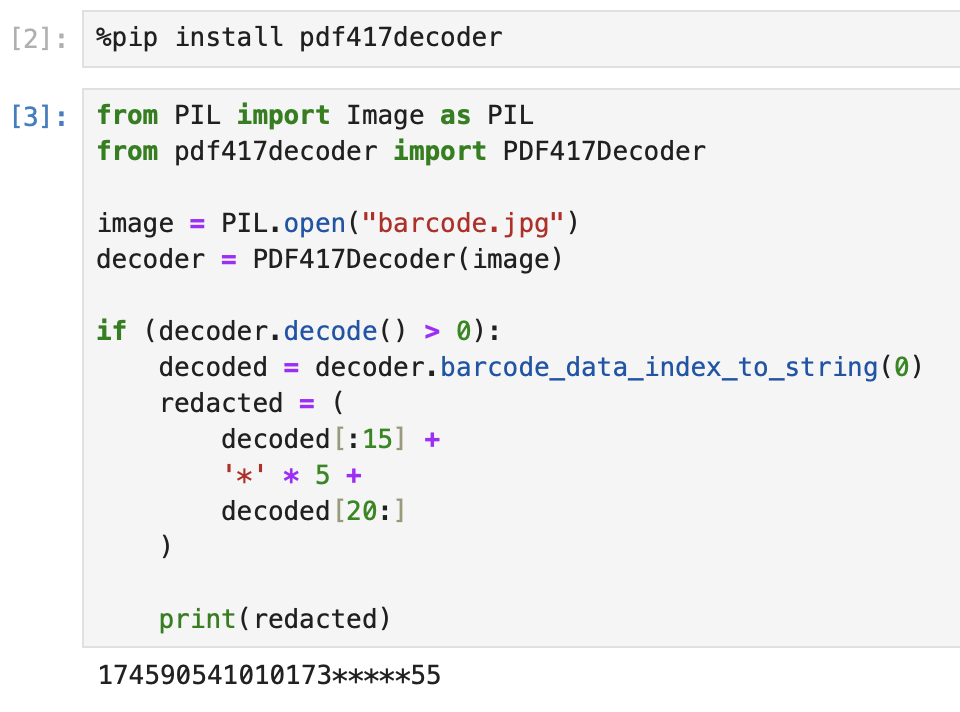
From looking at the decoded data, there's some information we can extract. Immediately, we can tell the first couple digits seem to be some sort of timestamp, followed by some sort of additional data. We can also make the assumption that the encoded data is also directly tied to the specific user who is logged into the app, since there has to be some mechanism to tie a barcode to a specific user account to charge them for the transaction. I generated a couple more barcodes and found that the barcode is represented as a 22 digit number where:
- The first 10 digits are the timestamp in seconds
- Followed by a "1" (which is presumably a barcode version identifier)
- Followed by a 10 digit, rotating PIN number that must somehow be tied to the user
- Followed by a "5" (or more generally, a check digit as we'll see later)
Note
We can actually verify this since the decompiled code actually tells us how it's formatted. More on this later.
At this point, we have a general idea as to how the barcode was formatted, however we don't really know how the 10 digit, user-specific PIN is generated. To figure this out, I tried a bunch of different approaches, including:
Attempting to intercept GET Mobile App traffic
To begin, I tried to intercept the GET Mobile app traffic using mitmproxy. This was the easiest thing to try first given Ticketmaster seemingly relies on network requests to generate barcodes. However, there's no network requests created when generating the barcode, so the barcode generation seemingly happened entirely on-device rendering this approach useless.
Decompiling the GET Mobile App (or the CBORD CS Gold App)
Knowing that the GET Mobile app isn't making network requests to generate barcodes, it's clear that if we want to get anywhere, we'd have to reverse engineer the functionality of GET Mobile. To begin, I tried decompiling the Android GET Mobile APK using JADX, and was left very confused by the decompiled Java code. I did some searching around and came across this article on someone else's attempt at reverse engineering CBORD's barcode generation process. Unfortunately for me, the app was no longer written in Javascript, but rather in Java, so I tried to use an older app that generated the same format of barcodes, so presumably the logic was shared. I installed CBORD's CS Gold, in hopes that it might be in Javascript, but no luck, also Java. Clearly, at this point I should just give up, but I started digging around, and searching for terms like "barcode". Lo and behold, I found:
/**
 * @ com.cbord.csg.mobileid.Shared
 */
public static String m12873A() {
    String str = f20026Y;
    String str2 = "createBarcodeString mVCI [" + f20025X + "]";
    if (f20025X.isEmpty()) {
        return "";
    }
    String str3 = "createBarcodeString patronKey [" + str + "]";
    if (str.equals("-1")) {
        return "";
    }
    try {
        String m13120a = C3292t8.m13120a(C3292t8.m13124a(C3292t8.m13123a(f20013L + f20017P), C3292t8.m13123a(f20025X)));
        int m13083a = C3220m6.m13083a(str);
        byte[] m13149b = C3312v8.m13149b(m13120a);
        byte[] m13150c = C3312v8.m13150c(str);
        byte[] m13149b2 = C3312v8.m13149b(C3292t8.m13120a(C3292t8.m13123a(f20019R + f20015N + f20022U)));
        byte[] m13146a = C3312v8.m13146a(m13149b2, m13149b);
        Arrays.fill(m13149b2, (byte) 0);
        Arrays.fill(m13149b, (byte) 0);
        long timeInMillis = Calendar.getInstance(TimeZone.getTimeZone("UTC")).getTimeInMillis() / 1000;
        String m13142a = C3312v8.m13142a(m13146a, Long.valueOf(timeInMillis), 9, f20049s);
        Arrays.fill(m13146a, (byte) 0);
        byte[] m13146a2 = C3312v8.m13146a(m13150c, C3312v8.m13148b(Long.parseLong(m13142a)));
        Arrays.fill(m13150c, (byte) 0);
        String m13141a = C3312v8.m13141a(timeInMillis, C3312v8.m13147b(m13146a2), m13083a);
        Arrays.fill(m13146a2, (byte) 0);
        return m13141a;
    } catch (Exception unused) {
        return "";
    }
}
From the snippet above, we can tell we need a couple things:
f20025X: VCI - not sure what it stands for, but you can find it by intercepting a network request from the CS Gold App. Unsure if it's unique per user, or per institution.str: Patron Key - this is the user identifier within CBORD's system. This is shared between GET Mobile and CS Gold.timeInMillis: Unlike what the name suggests, this is the current timestamp in seconds, not milliseconds.
Warning
This is a LOOONNNGG read with lots of code snippets, so if you want to skip to the end, you can find the summary of what everything does here.
Let's then find C3292t8.m13120a:
public static String m13120a(byte[] bArr) {
    StringBuilder sb = new StringBuilder();
    for (byte b2 : bArr) {
        int i = (b2 + C2719g.f17998l) & 255;
        sb.append(f24012C[(i >> 4) & 15]);
        sb.append(f24012C[i & 15]);
    }
    return sb.toString();
}
Seemingly this is a byte to hex conversion function. Let's then find C3292t8.m13124a:
public static byte[] m13124a(byte[] bArr, byte[] bArr2) {
    SecretKeySpec secretKeySpec = new SecretKeySpec(bArr, "AES");
    Cipher cipher = Cipher.getInstance("AES/CBC/NoPadding");
    cipher.init(2, secretKeySpec, new IvParameterSpec(f24013D));
    return cipher.doFinal(bArr2);
}
...
private static final byte[] f24013D = {0, 0, 0, 0, 0, 0, 0, 0, 0, 0, 0, 0, 0, 0, 0, 0};
This tells us that the data is encrypted using AES in CBC mode with no padding. This is seemingly a method to do AES Decryption using the two byte arrays and a IV which is apparently just a 16-byte 0-padded byte array. Let's then find C3292t8.m13123a:
public static byte[] m13123a(String str) {
    return Base64.decode(str, 0);
}
This is a basic Base64 decode. This just tells us that the data is Base64 encoded. This tells us that:
f20025Xandf20013L + f20017Pis Base64 encoded. Let's then findC3220m6.m13083a:
public class C3220m6 {
    /* renamed from: a */
    public static int m13083a(String str) {
        int m13084a = 10 - (m13084a(str, true) % 10);
        if (m13084a % 10 == 0) {
            return 0;
        }
        return m13084a;
    }

    /* renamed from: a */
    private static int m13084a(String str, boolean z) {
        int i = 0;
        for (int length = str.length() - 1; length >= 0; length--) {
            int parseInt = Integer.parseInt(str.substring(length, length + 1));
            if (z && (parseInt = parseInt * 2) > 9) {
                parseInt = (parseInt % 10) + 1;
            }
            i += parseInt;
            z = !z;
        }
        return i;
    }
}
For full context, I included the entire class. This is essentially Luhn's Algorithm, except this is slightly different in how it handles the actual doubling of the digits. It's essentially just shifting the doubling to the right by one digit. This effectively tells us:
m13083ais the check digit for the barcode, and it's generated by this modified Luhn's Algorithm which is generated using the user's Patron Key. This also tells us that the Patron Key must be a string of digits (this helps narrow down possible patron keys later). Let's continue withC3312v8.m13149b:
public static byte[] m13149b(String str) {
    int length = str.length();
    byte[] bArr = new byte[length / 2];
    for (int i = 0; i < length; i += 2) {
        bArr[i / 2] = (byte) ((Character.digit(str.charAt(i), 16) << 4) + Character.digit(str.charAt(i + 1), 16));
    }
    return bArr;
}
This is a hex to byte conversion function. Let's then find C3312v8.m13150c:
public static byte[] m13150c(String str) {
    byte[] bArr = {0, 0, 0, 0};
    System.arraycopy(m13148b(Long.parseLong(str)), 0, bArr, 0, bArr.length);
    return bArr;
}
public static byte[] m13148b(long j) {
        byte[] bArr = new byte[8];
        for (int i = 0; i < 8; i++) {
            bArr[i] = (byte) ((j >> (i * 8)) & 255);
        }
        return bArr;
    }
This is a long to 8 byte conversion. Let's find f20019R + f20015N + f20022U:
/**
 * @ com.cbord.csg.mobileid.Shared
 */
public static void m12919g(int i) {
    f20013L = C3292t8.m13118a(i * 0);
    f20014M = C3292t8.m13118a(i * 1);
    f20015N = C3292t8.m13118a(i * 2);
    f20016O = C3292t8.m13118a(i * 3);
    f20017P = C3292t8.m13118a(i * 4);
    f20018Q = C3292t8.m13118a(i * 5);
    f20019R = C3292t8.m13118a(i * 6);
    f20020S = C3292t8.m13118a(i * 7);
    f20022U = C3292t8.m13118a(i * 8);
    f20023V = C3292t8.m13118a(i * 9);
    f20024W = C3292t8.m13118a(i * 10);
    f20021T = C3292t8.m13118a(i * 11);
}
If we look for calls to m12919g, we find:
/**
 * com.cbord.csg.mobileid.CardActivity
 */
public class CardActivity extends HomeActivity {
    ...
    private int f19594q0 = 3;
    ...
    public void onCreate(Bundle bundle) {
        ...
        Shared.m12919g(this.f19594q0);
        ...
    }
    ...
}
Eventually, if you followed the trail, you get to some set of values and you can make your own conclusions from that.
Out of ethical concerns, I don't think publishing the secrets is the right thing to do, though it's definitely possible to do exactly what I did to figure out what I did.
Let's find C3312v8.m13146a:
public static byte[] m13146a(byte[] bArr, byte[] bArr2) {
    byte[] bArr3 = new byte[bArr.length];
    for (int i = 0; i < bArr.length; i++) {
        bArr3[i] = (byte) (bArr[i] ^ bArr2[i % bArr2.length]);
    }
    return bArr3;
}
This is XOR'ing each byte of the two byte arrays together, wrapping around the second byte array if it's shorter than the first. Let's find C3312v8.m13142a:
public static String m13142a(byte[] bArr, Long l, int i, String str) {
    byte[] bArr2 = {0, 0, 0, 0, 0, 0, 0, 0};
    byte[] m13148b = m13148b(l.longValue());
    for (int i2 = 0; i2 < bArr2.length; i2++) {
        bArr2[(bArr2.length - i2) - 1] = m13148b[i2];
    }
    int i3 = m13145a(str, bArr, bArr2)[r5.length - 1] & 15;
    String l2 = Long.toString(((r5[i3 + 3] & C2719g.f17999m) | ((((r5[i3] & Byte.MAX_VALUE) << 24) | ((r5[i3 + 1] & C2719g.f17999m) << 16)) | ((r5[i3 + 2] & C2719g.f17999m) << 8))) % f24069a[i]);
    while (l2.length() < i) {
        l2 = "0" + l2;
    }
    return l2;
}
public static byte[] m13148b(long j) {
    byte[] bArr = new byte[8];
    for (int i = 0; i < 8; i++) {
        bArr[i] = (byte) ((j >> (i * 8)) & 255);
    }
    return bArr;
}
private static byte[] m13145a(String str, byte[] bArr, byte[] bArr2) {
    try {
        Mac mac = Mac.getInstance(str);
        mac.init(new SecretKeySpec(bArr, "RAW"));
        return mac.doFinal(bArr2);
    } catch (GeneralSecurityException e) {
        throw new UndeclaredThrowableException(e);
    }
}
This seems to be the logic behind the TOTP generation. Let's find C3312v8.m13147b:
public static long m13147b(byte[] bArr) {
    long j = 0;
    for (int i = 0; i < bArr.length; i++) {
        j += (bArr[i] & 255) << (i * 8);
    }
    return j;
}
This basically converts the byte array to a long. Let's find C3312v8.m13141a:
public static String m13141a(long j, long j2, int i) {
    return (String.format("%010d", Long.valueOf(j)) + "1" + String.format("%010d", Long.valueOf(j2))) + String.valueOf(i);
}
This is the final formatting of the barcode. This tells us that:
- The first 10 digits are the timestamp in seconds
- Followed by a "1" (which is presumably a barcode version identifier)
- Followed by a 10 digit TOTP number composed of a rotating 9-digit TOTP that is padded with a leading 0 (always the case) to reach 10 digits
- Followed by a "check digit" that is SOLELY dependent on the Patron Key, so not really a check digit in the traditional sense, but you get the idea
Important
This effectively validates our previously assumed format of the barcode.
Summary of what everything does
Shared.m12873A()is the barcode generation encoding function.String str = f20026Yis the Patron Key - this is fetched via an API call to CBORD's API.str2 = "createBarcodeString mVCI [" + f20025X + "]"which stores the VCI, but str2 is unused - this is fetched via an API call to CBORD's API.String m13120a = C3292t8.m13120a(C3292t8.m13124a(C3292t8.m13123a(f20013L + f20017P), C3292t8.m13123a(f20025X)))is doing the AES Decryption of the Base64 encoded stringf20013L + f20017Pusing the Base64 decodedf20025Xas the key, then converting the result to hex where:f20013L + f20017Pis0u<REDACTED>f20025Xis the VCIC3292t8.m13123ais the Base64 Decode FunctionC3292t8.m13124ais the AES Decryption FunctionC3292t8.m13120ais the Byte to Hex Conversion Function
int m13083a = C3220m6.m13083a(str)is generating the check digit using the modified Luhn's Algorithm where:stris the Patron KeyC3220m6.m13083ais the modified Luhn's Algorithm Function
byte[] m13149b = C3312v8.m13149b(m13120a)is converting the hex string to bytes where:C3312v8.m13149bis the Hex to Byte Conversion Functionm13120ais the above result of the AES Decryption
byte[] m13150c = C3312v8.m13150c(str)is converting the Patron Key to 8 bytes where:C3312v8.m13150cis the Long to 8 Byte Conversion Functionstris the Patron Key
byte[] m13149b2 = C3312v8.m13149b(C3292t8.m13120a(C3292t8.m13123a(f20019R + f20015N + f20022U)))is converting the Base64 decoded stringf20019R + f20015N + f20022Uwhich gives a byte array, then converting the byte array to hex and ultimately reconverting it to bytes where:f20019R + f20015N + f20022UisUP<REDACTED>C3292t8.m13123ais the Base64 Decode FunctionC3292t8.m13120ais the Byte to Hex Conversion FunctionC3312v8.m13149bis the Hex to Byte Conversion Function
byte[] m13146a = C3312v8.m13146a(m13149b2, m13149b)is XOR'ing the two byte arrays together where:C3312v8.m13146ais the XOR Functionm13149b2is the byte array from the Base64 decoded stringf20019R + f20015N + f20022Um13149bis the byte array from the hex string of the AES Decryption
Arrays.fill(m13149b2, (byte) 0)andArrays.fill(m13149b, (byte) 0)is clearing the byte arrays.long timeInMillis = Calendar.getInstance(TimeZone.getTimeZone("UTC")).getTimeInMillis() / 1000is getting the current timestamp in seconds, not milliseconds.String m13142a = C3312v8.m13142a(m13146a, Long.valueOf(timeInMillis), 9, f20049s)this seemingly handles the TOTP generation where:C3312v8.m13142ais the TOTP Generation Functionm13146ais the byte array from the XOR operationLong.valueOf(timeInMillis)is the current timestamp in seconds - this is the moving variable which is also the first 10 digits of the barcode9is the length of the TOTPf20049sis "HmacSHA256" which is the hashing algorithm used
Arrays.fill(m13146a, (byte) 0)is clearing the byte array.byte[] m13146a2 = C3312v8.m13146a(m13150c, C3312v8.m13148b(Long.parseLong(m13142a)))is XOR'ing the patron key byte array with the TOTP byte array where:C3312v8.m13146ais the XOR Functionm13150cis the byte array from the Patron KeyC3312v8.m13148b(Long.parseLong(m13142a))is converting the TOTP to 8 bytes
Arrays.fill(m13150c, (byte) 0)is clearing the byte array.String m13141a = C3312v8.m13141a(timeInMillis, C3312v8.m13147b(m13146a2), m13083a)is generating the final barcode string where:C3312v8.m13141ais the Barcode Formatting FunctiontimeInMillisis the current timestamp in secondsC3312v8.m13147b(m13146a2)is converting the byte array from the XOR operation to a longm13083ais the check digit from the modified Luhn's Algorithm
Arrays.fill(m13146a2, (byte) 0)is clearing the byte array.return m13141ais returning the final barcode string.
Note
For simplicity, there's API calls that the app makes to fetch the VCI Key and Patron Key. This does not document how to find those keys, however the Patron Key is entirely possible to get by intercepting network requests made by the GET Mobile app, and you can substitute the VCI Key with the Institution Key which is what GET Mobile uses. The VCI Key and AES Key are only used in the CS Gold app, not the GET Mobile app.
Soooo, now what?
Well, we figured out the logic behind the barcode encoding process, so we can attempt to replicate the functionality ourselves. I won't pretend like I understood how to implement everything myself, so with the help of Gemini 2.5 Pro Preview and Claude 3.7 Sonnet, I was able to slowly create this python script available on GitHub that replicates the functionality of the GET Mobile app's barcode generation process. Alternatively, here's a Node.js version of the same script in terms of functionality.
Script Usage
The script is fairly straightforward to use. The instructions are available within the script itself at the start, but here's a quick rundown that should be enough to get started.
- If Python, install the required dependencies:
pip install pycryptodome
If Node.js, just make sure you have node installed. There's no other dependencies.
- Set Up:
Prior to running the script, make sure you have the following information:
- Patron ID: This is the user identifier within CBORD's system. This is shared between GET Mobile and CS Gold.
- VCI: This is the VCI, but I'm not sure what it stands for. You can find it by intercepting a network request from the CS Gold App. Unsure if it's unique per user, or per institution. I would assume it's actually constant per institution, so users of the same institution should have the same VCI.
- AES Key: This is the Base64 encoded string
f20013L + f20017Pwhich is0u<REDACTED>. - Static Key Part: This is the Base64 decoded string
f20019R + f20015N + f20022Uwhich isUP<REDACTED>. This should be the same for all institutions. - Institution Key: This is, as far as I can tell, used by the GET Mobile App, not the CS Gold App, though it is derived from the AES Key and VCI Key. If you provide an institution key, you don't need to provide the VCI or AES Key. However, if you don't have the institution key, you need to provide the VCI and AES Key. Regardless, the static key part is always required, and the Patron ID is always required.
Note
I would recommend actually putting your Patron ID, VCI Key, AES Key, and Static Key Part into the script itself as variables, and then running the script. This will make your life significantly easier than having to pass in the arguments every time you run the script.
| CLI Argument | Script Key | What Is It? | Required? |
|---|---|---|---|
--patron-id | PATRON_ID | This is a unique user identifier shared between CBORD's API, GET Mobile and CS Gold. | YES |
--vci | VCI_BASE64 | This is a pre-shared key that is fetched via an API call. | Only if you don't have the institution key. |
--aes-key | AES_KEY | This is the Base64 encoded string f20013L + f20017P which is 0u<REDACTED>. | Only if you don't have the institution key. |
--static-keypart | STATIC_KEYPART | This is the Base64 encoded string f20019R + f20015N + f20022U which is UP<REDACTED>. | YES |
--institution-key | INSTITUTION_KEY | This is a pre-shared key that is fetched via an API call by GET Mobile, not CS Gold. | Preferred if you have the institution key. This is somehow derived from the AES Key and VCI Key where the AES Key is the secret, and the VCI Key contains the data. If you have the institution key, it's less compute. |
- Run the Script: Once you have the necessary information, you can run the script. The script will generate the barcode content based on the provided information. You can then use this barcode content to generate a barcode image using any barcode generation library. I will operate under the assumption that you did not follow the advice above and instead want to run the script with the command line arguments since that's the more complex use case.
For Python:
# without the institution key,
python3 barcode.py --patron-id <PATRON-ID> --vci <VCI> --aes-key <AES-KEY> --static-keypart <STATIC-KEYPART>

# or if you have the institution key,
python3 barcode.py --patron-id <PATRON-ID> --institution-key <INSTITUTION-KEY> --static-keypart <STATIC-KEYPART>
Or for Node.js:
# without the institution key,
node barcode.js --patron-id <PATRON-ID> --vci <VCI> --aes-key <AES-KEY> --static-keypart <STATIC-KEYPART>

# or if you have the institution key,
node barcode.js --patron-id <PATRON-ID> --institution-key <INSTITUTION-KEY> --static-keypart <STATIC-KEYPART>
Doing this will generate the encoded contents of the barcode, which you can then use to generate the barcode image using any barcode generation library. This might be added at a later date, but I didn't integrate that into the script since I didn't need that necessarily.
If you'd like to verify that the script works, you can actually provide the CBORD generated barcode content, and the script will attempt to generate the same barcode content. This is done using the --verify flag.
python3 barcode.py [...NECESSARY_KEYS] --verify <CBORD-BARCODE-CONTENT>
Or for Node.js:
node barcode.js [...NECESSARY_KEYS] --verify <CBORD-BARCODE-CONTENT>
If, for whatever reason, you want to generate the barcode content for a specific timestamp, you can use the --timestamp flag. This is useful for generating barcodes in the past or future.
python3 barcode.py [...NECESSARY_KEYS] --timestamp <TIMESTAMP>
Or for Node.js:
node barcode.js [...NECESSARY_KEYS] --timestamp <TIMESTAMP>
This will generate the barcode content for the specified time. If you don’t provide one, the script will use the current timestamp.
If you are interested in the various keys used in the script, you can actually see the results by running with the --debug flag. This will print out the various keys used in the script as well as how they change over the course of the script as they are used to generate other keys.
Note
The reason the date on this post goes back to October 2024 is because I actually started this whole "build-a-custom-GET-Mobile" project back then (see GET Open Door), but actually couldn't figure out how to reverse engineer the barcode generation process until now, and ended up giving up multiple times.